


Diagnosing and disabling bugged CPU cores
Yesterday my CPU died: constant reboots, BSODs, freezes, etc. Usually I would buy new hardware, but I couldn’t waste time with that just yet, so I managed to find out what exactly was failing and how to avoid it. Most people won’t bother with this kind of stuff, but I thought I should document the process I followed; it might be of help to someone, some day.
Disclaimer: I’m stuck with Windows OS for various reasons, so if you use any of the OS master races, half of this stuff will be useless I’m afraid.
- First of all, make sure the reboots are due to CPU issues. For that, follow the usual procedure: unplug all devices you don’t need, test your ram, yada yada

- Download prime95, open it, choose 1 torture test thread, choose Small FFTs option, and don’t click “OK” just yet (or you risk an insta-BSOD)
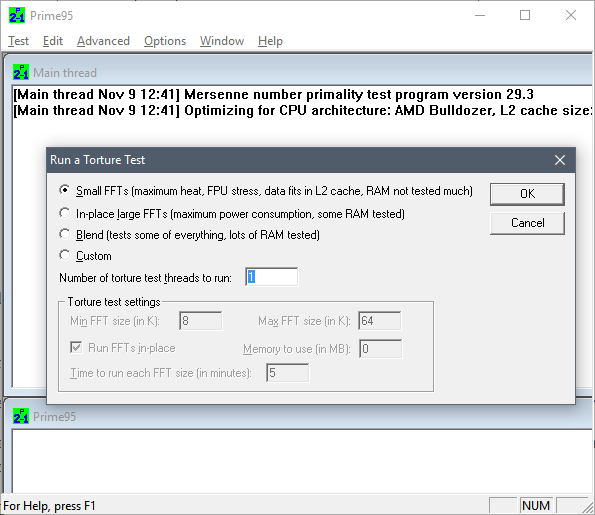
- Go to task manager, click More details, go to Details tab, locate and right click on prime95 process, click “Set affinity”, uncheck all CPUs except the first one.

- Go back to prime95, click OK to start the test on that one core. Let it run for 5 minutes. If any numeric error or warning message shows up, it freezes, it ends in BSOD, etc, then that core is probably busted.
- Repeat the test choosing different affinities, this will test a different core each time.
- After that, I would also test pairs of cores. Hyperthreading, shared-FPUs, shared L2, heat dissipation problems, etc, can all lead to failures only when several cores are used at the same time.For that, your best bet is to test with affinity set to consecutive pairs of cores, and then adjusting the number of threads in prime95 accordingly.
In my case, this yielded problems in the 5th and 6th core (always failing when used in conjunction, and rarely when run in isolation). I would bet the problem is their shared FPU path, but I have no idea how to find out for sure.
Once you have determined the failing core or cores, you can survive without a new CPU this way:
- If your BIOS allows it, look for the option to selectively disable cores. My mobo allows disabling pairs of cores rather than individual ones, but that was okay in my case, since I had to nuke one of those pairs.
- If that’s not possible, hit Win+R, run msconfig, go to Boot tab, click Advanced Options, mark “Number of processors”, and choose the appropriate amount. You will probably lose some working cores, but it’s something ¯\_(ツ)_/¯
And of course, if you can afford the wait, just throw that CPU away and buy new parts. Otherwise your CPU will be limping around… and the rest of cores are likely to follow the same path anyway.
Hacking the LGA 775 socket
Hello, and welcome to CPU Dealers!
In todays episode we’re going to learn how to fit an LGA771 CPU into an LGA775 motherboard with no brute force!
Motivation
So why on earth would anyone decide to put an LGA771 Xeon server cpu into a domestic LGA775 motherboard, you may ask?
Welp, because it’s fun and you get to learn stuff, thats why!
Traditional motivation: Money
However, the usual argument is that, if you are planning a modest upgrade for your shitty old LGA775 system, not needing the latest and greatest, you can save some money this way. See, there’s lots of Xeon processors in the market right now, and they are all dirt cheap. The interesting thing is that most LGA775 CPUs have Xeons equivalents:

The Xeon I chose, an E5440 SLBBJ. Same speed as a Q9550, but requires less juice, so has a lower TDP. Source: here and there.
Some people argue that Intel simply bins Xeons better than the consumer counterparts, so while being essentially the same CPU, the Xeons are more reliable, run colder, and are harder, better, faster, stronger.
The LGA775 market, on the other hand, is filled with pretty expensive CPUs. They’re all usually priced 30€ to 150€ higher than the server versions: Xeons are definitely the best bang for the buck. So the plan usually is:
- Upgrade your system to a Xeon instead of a domestic CPU.
- …
- Fun and profit!
Side motivation: Overclocking
Some people take advantage of the lower voltages required by Xeons, and choose them not only because they’re cheaper, but because it’s in theory easier to squeeze a bit more speed out of them.
Keeping that in mind, I chose an E0 stepping (later revisions usually lower power requirements of the CPU). Unfortunately, my SLBBJ unit was already running pretty hot at stock voltages and clocks, so I’m leaving it alone for the time being.
Background
LGA775 (codenamed Socket T) was introduced by Intel around mid-2004, and used in domestic motherboards. The most popular CPUs running those LGAs are now Core2Duos and Core2Quads.
A year and a half later, in 2006, Intel introduced LGA771, a very similar LGA intended for use in multiprocessor server motherboards, and which can host Intel Xeon processors.
Looking at the official datasheets released by Intel (page 41 here and page 52 here) , we can check the pinouts of both LGAs, and spot their differences:
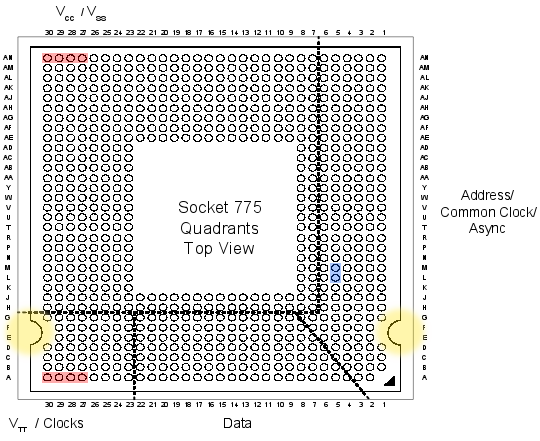
If we checked the socket pin assignment one by one, we could see that there’s 76 different pins in total. But most of them are irrelevant (reserved for future uses, etc), they pose no problem for our conversion mod, so we’re left wondering about the colored pins:
- Red: 8 pins only used in LGA775.
- Green: 4 pins only used in LGA771.
The red and green pins are all power pins (VCC, VSS at the top, and VTT at the bottom). There’s hundreds more of them in the LGA, so I’m sure our new CPU won’t mind if we remove just these few.
- Blue: 2 pins that have different purposes in each LGA.
These pins (L5 and M5) serve different purposes in LGA775 than in LGA771. And this time they are important pins (one of them is the Execute BIST pin, Built-In Selft Test, needed to boot). Fortunately, Intel had simply swapped their places in the newer 771 LGA! So it should be relatively easy to re-wire them.
- Yellow: not a pin, just highlighting the different shapes 🙂
These differing yellow shapes can be a problem, since the CPUs from one LGA will not physically fit in the other LGA without some hardware modifications. We’ll get to this later on.
Uh, in case you’re wondering, I did not personally go over all the pin specifications one by one. But this guy did.
Motherboard support
In most cases, the CPU will run as-is. This was the case of my 965P-DS3 motherboard.
Sometimes, you may need to manually patch your BIOS, adding the microcode of your specific Xeon model to the internal “whitelist” (so to speak). Additionally, this usually forces your mobo to acknowledge that your Xeon CPU implements the SSE4 instruction set (which can give an extra speed boost in some applications).

I didn’t patch my BIOS just yet… so instead, I decided to steal this screenshot from Google Images. Sue me.
And in a few rare cases, your motherboard will directly refuse to boot the new CPU, regardless of any BIOS patching you may attempt. In that case, you’re out of luck.
Before attempting to transform your LGA775, search the web and check if your chipset will be happy with a Xeon CPU.
In any case, bear in mind that your mobo needs to support the speeds that your specific Xeon choice requires: voltage, FSB speeds, etc. Otherwise you’ll have to resort to underclocking the CPU (sad), or to overclocking your motherboard/ram (yay! but not recommended).
Procedure
First, open your tower, remove the heatsink, then the CPU:

There lies my old Core2Duo E4300, overclocked to hell, ready for retirement.
Now we do what the title says: we hack the LGA775 socket. Literally.
Yes, take a sharp knife or a cutter, and prepare to slash some plastic. The exact bits you have to cut off are the ones colored yellow in the LGA775 pinout diagram (scroll back to the beginning of this post). It should end up looking something like this:

Actually, please try to aim for cleaner cuts than the mess you see in this photo.
The motherboard is ready!
Now we need to hack the Xeon CPU itself. Remember the blue pins that had switched places in LGA771? It’s time to revert what Intel did, and get a 775-compatible pinout layout.
If you’re good enough you could try to swap them yourself, using whatever technique you come up with. But the rest of us mortals will resort to buying a ready to use swapper sticker. Search for “775 771 mod” in ebay, play safe and buy several of them, just in case you break one in the process:

Be very careful with the sticker, it’s very easy to break its internal wiring.
So there’s that. Now we simply have to put the Xeon in the LGA, add thermal paste, heatsink, etc:

Yay, we’re done!
Finally, plug the PSU, pray to Flying Spaghetti Monster, and boot the system!
Results
Here’s a nice comparison graph of the results. The contenders are:
- A Core2Duo E4300 (LGA775), at speeds ranging from 1.8GHz (stock) up to 3.01GHz (overclocked).
- A Xeon E5440 (LGA771), at stock speed (2.83GHz).
The benchmarks are:
- Assetto Corsa, a multithreaded racing simulator (M30 Gr.A Special Event), FPS measured with my own plugin FramerateWatcher.
- PI calculator SuperPI, 2M variant, running in a single thread.
- Average maximum temperature reached by all cores, over a period of 15 minutes running In-place large FFTs torture test in Prime95.

And the winner is…
The winner is the Xeon, as it should: specially in multithreaded programs, the Xeon obliterates the Core2Duo.
But it’s interesting to note that, even running at the same clock speed of around 2.8GHz, the Xeon outperforms the Core2Duo by more than 20% in single threaded applications.
I checked the FSB and RAM multipliers in both cases, just in case the Xeon had an advantage on that front, but it was actually the E4300 which had higher FSB and RAM clocks!
Goes to show how clock isn’t everything when it comes to performance, and obviously better CPU technology consists of more than higher clock freq and greater number of cores.
The end
So that’s it, that’s the story of how I more than doubled the framerates in games and halved compilation times for the cost of 4 movie tickets.
Hope you enjoyed reading this article as much as I definitely did not enjoy proof-reading it! 😉

